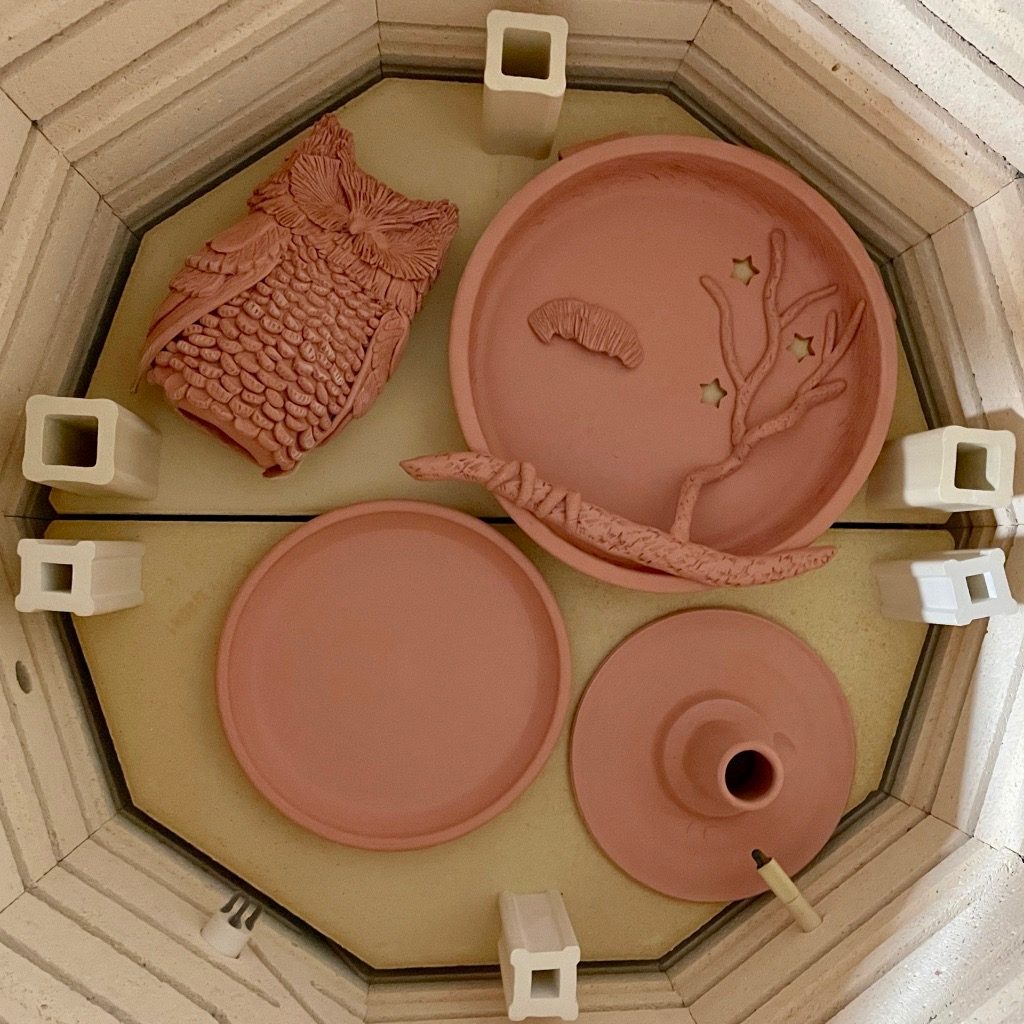
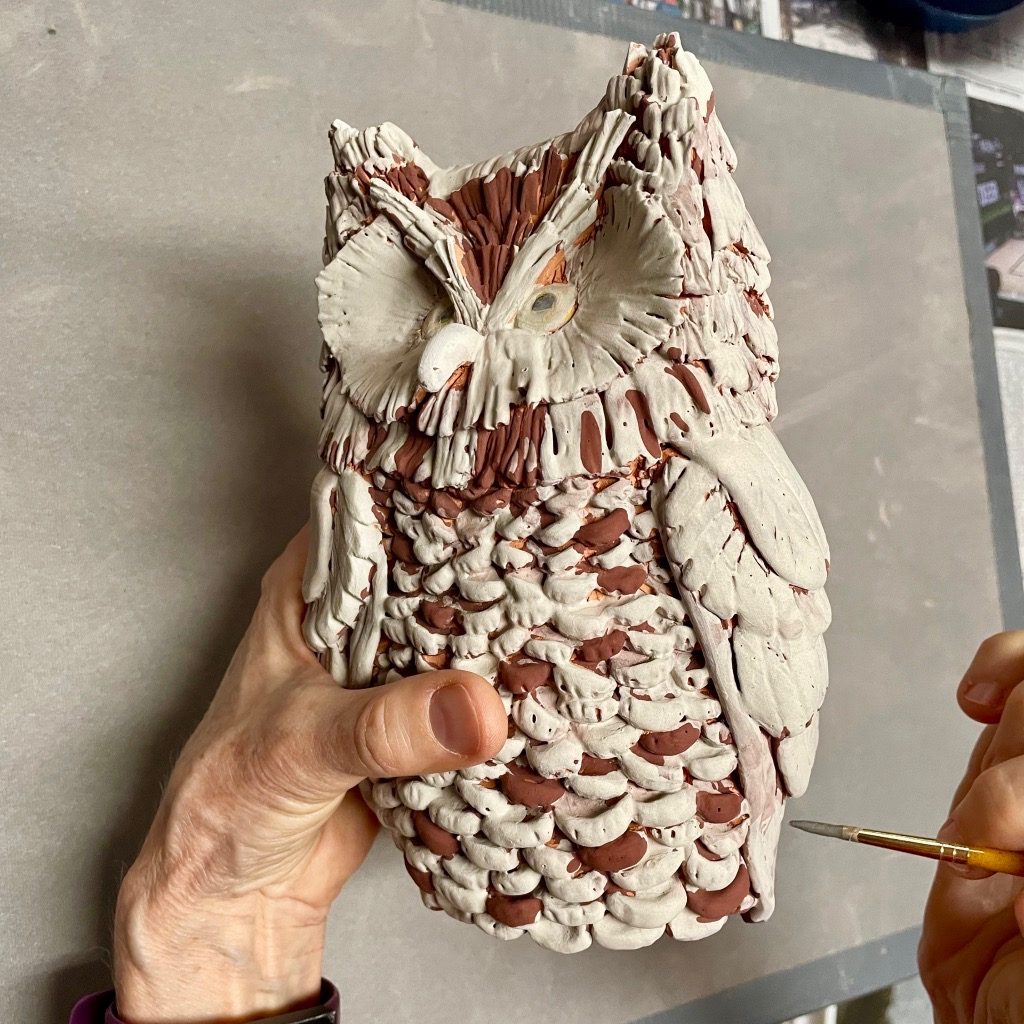
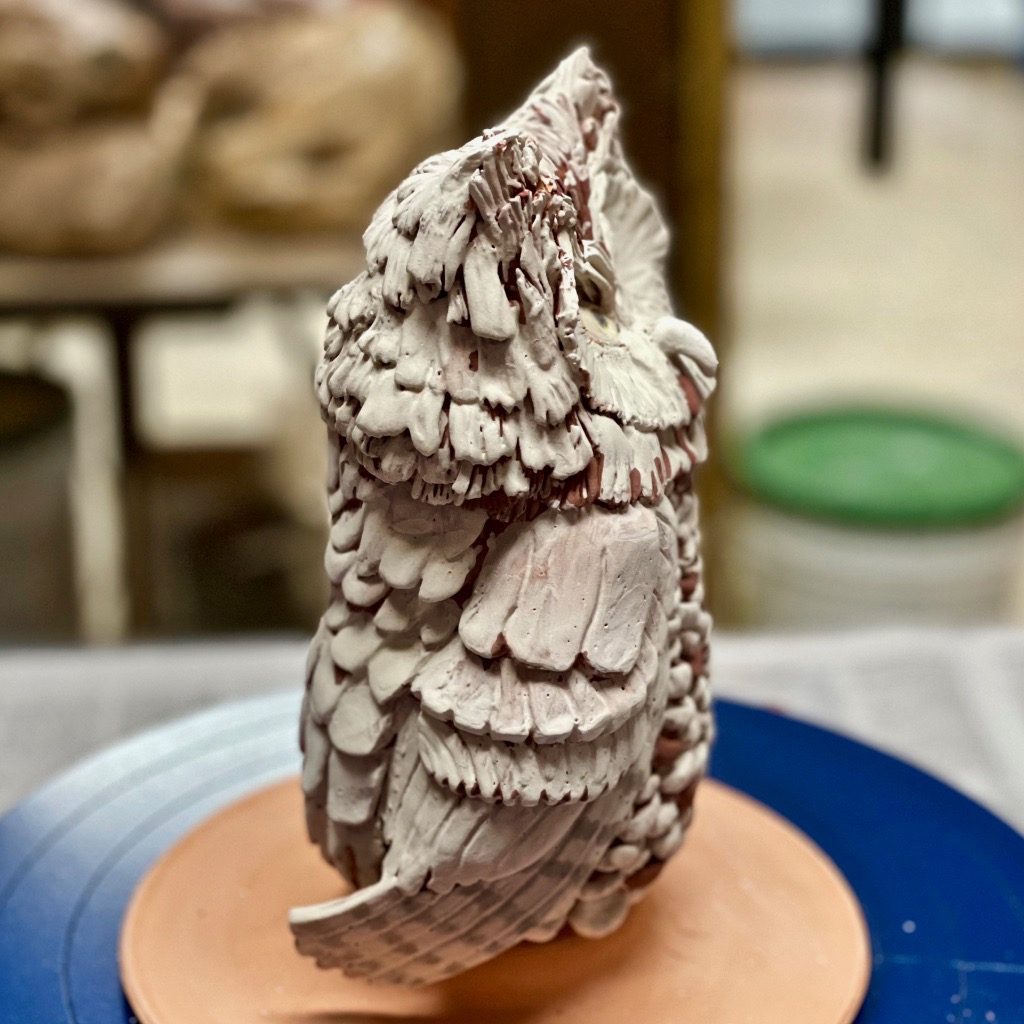
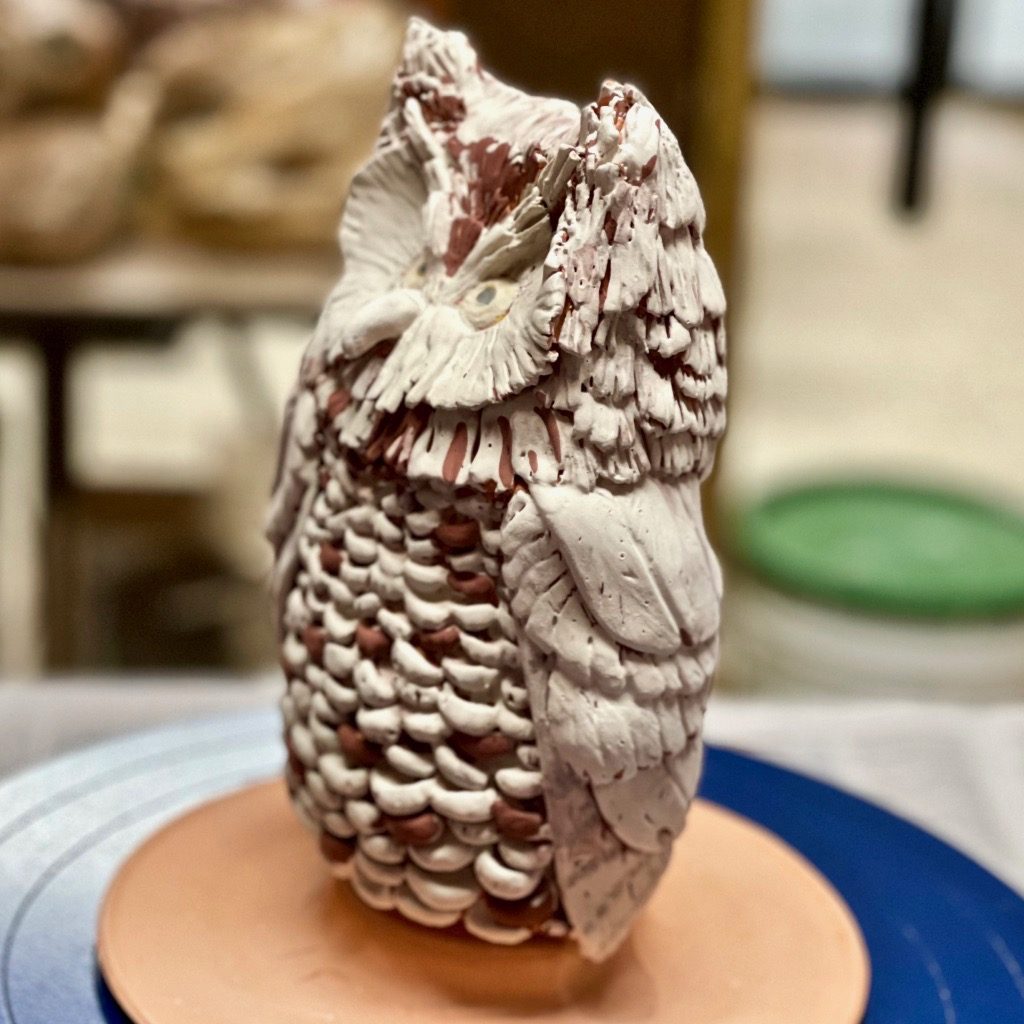
In my last Blog post, I introduced my new art and engineering challenge for a kickoff to this year. This work challenges me to work in new art areas and solve engineering challenges. It’s been fun so far. I have thoroughly enjoyed combining what I know about creating functional art and using those skills to create something purely for pleasure. In the last Blog post, I told the story of starting from a sketch on paper and then determining how to make feathers as well as how to apply them for a stylistically natural effect. But most importantly, I had to look ahead to the future stages to ensure that I accounted for issues that could arise, such as constructing the entire work and glazing individual pieces. The first step was to unload the pieces from the kiln. Do you see the difference between this photo and the photo at the end of my most recent blog posting, Twilight Tremolo – Part 1? The kiln would not turn on, so I had to unload the kiln, solve the problem with the firing and then reload the greenware. Once the kiln was fixed, I was so glad that it would fire, that I started the kiln firing without taking a new photo. You can read all about this in a future blog post that perhaps I should fittingly call “Kiln Woes”.
Glazing was a particularly interesting challenge because I was using the glazes that I normally use for my functional art. (I did use an underglaze in one place, but more on that later). I designed how to glaze the owl and her roosting hollow to achieve my desired effects. Glazes are always a gamble. Their resulting colors and surface effects depend on many factors including how thickly the glaze is applied, the temperature of the kiln as well as how long the kiln is held at that temperature, whether the glaze can pool on the piece, or whether the glaze runs down the piece as it melts in the kiln. My kiln is not computer controlled. It uses a manual kiln sitter to turn the kiln off when it reaches the desired temperature. Therefore, the degrees of freedom that I have to change the effect of the glazes by the rate of temperature increase and time at a specific temperature are limited.
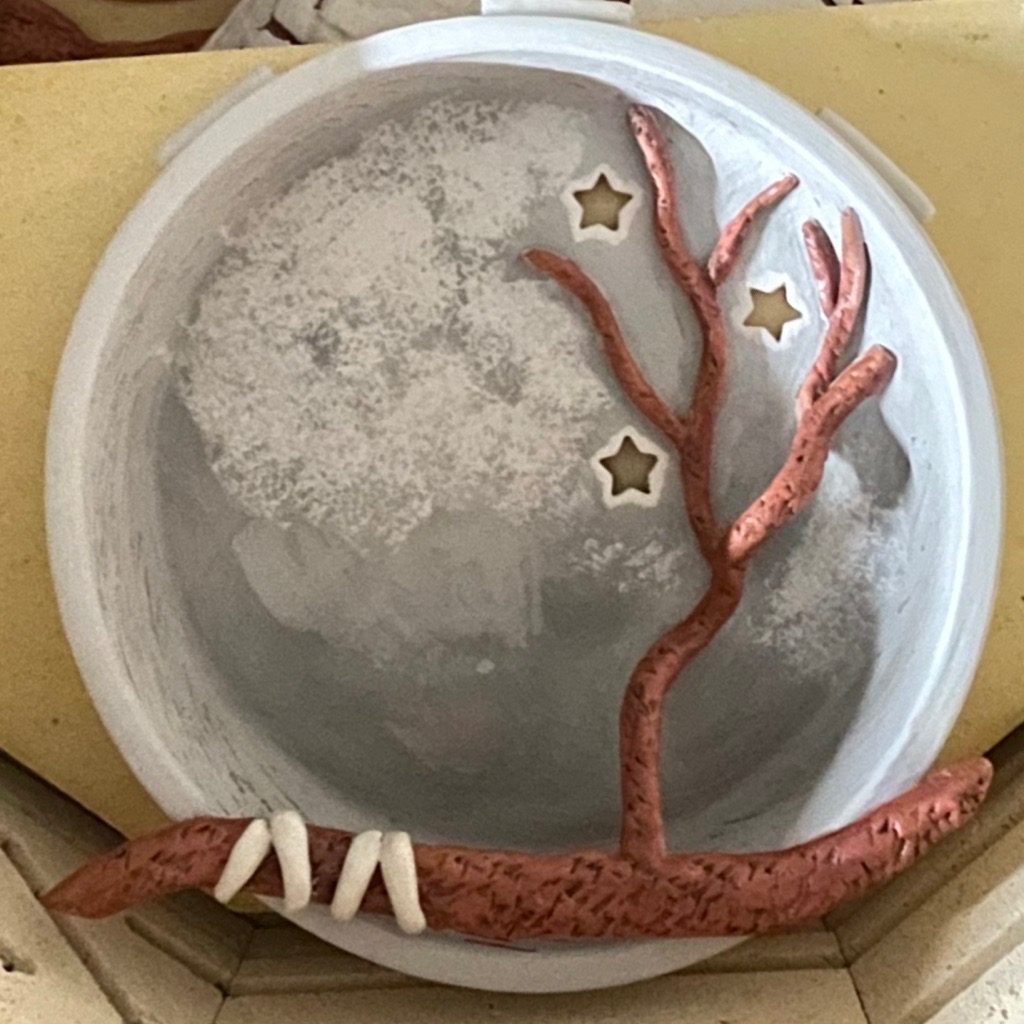
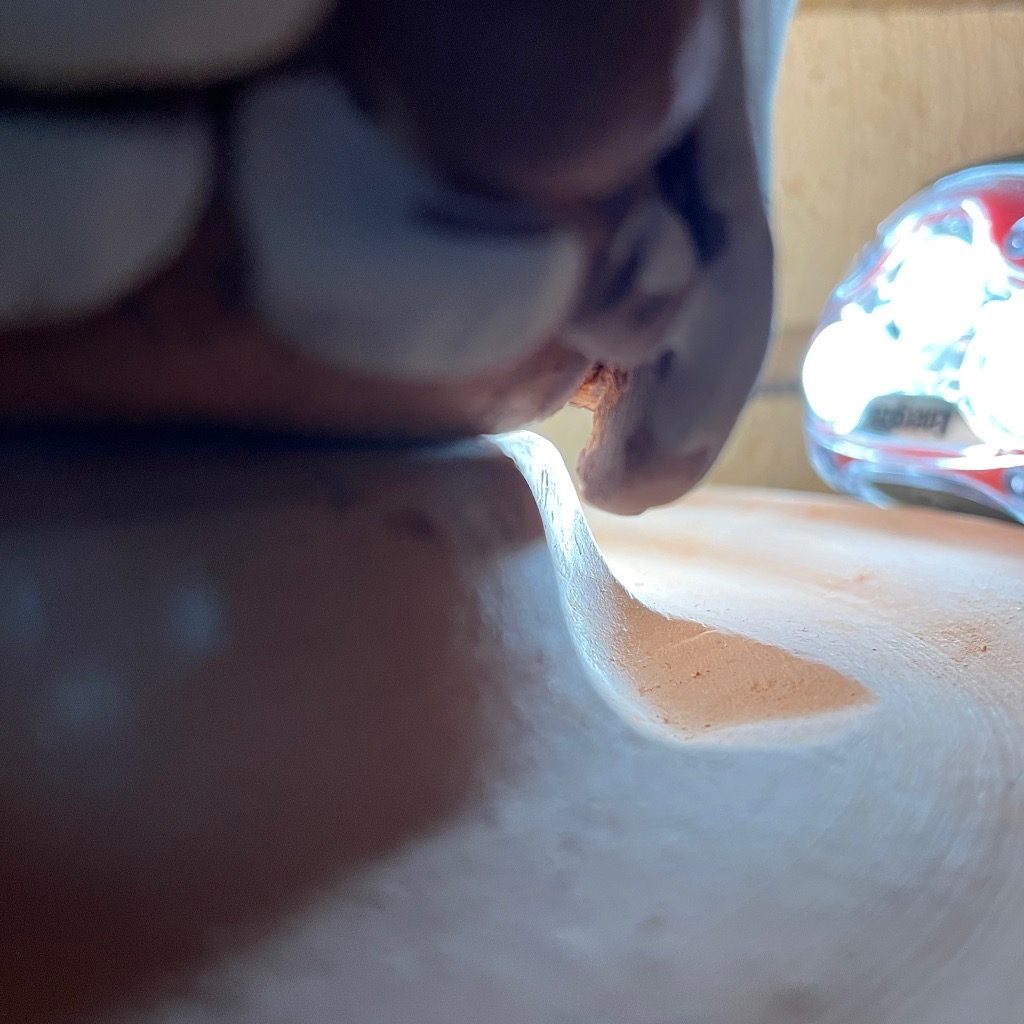
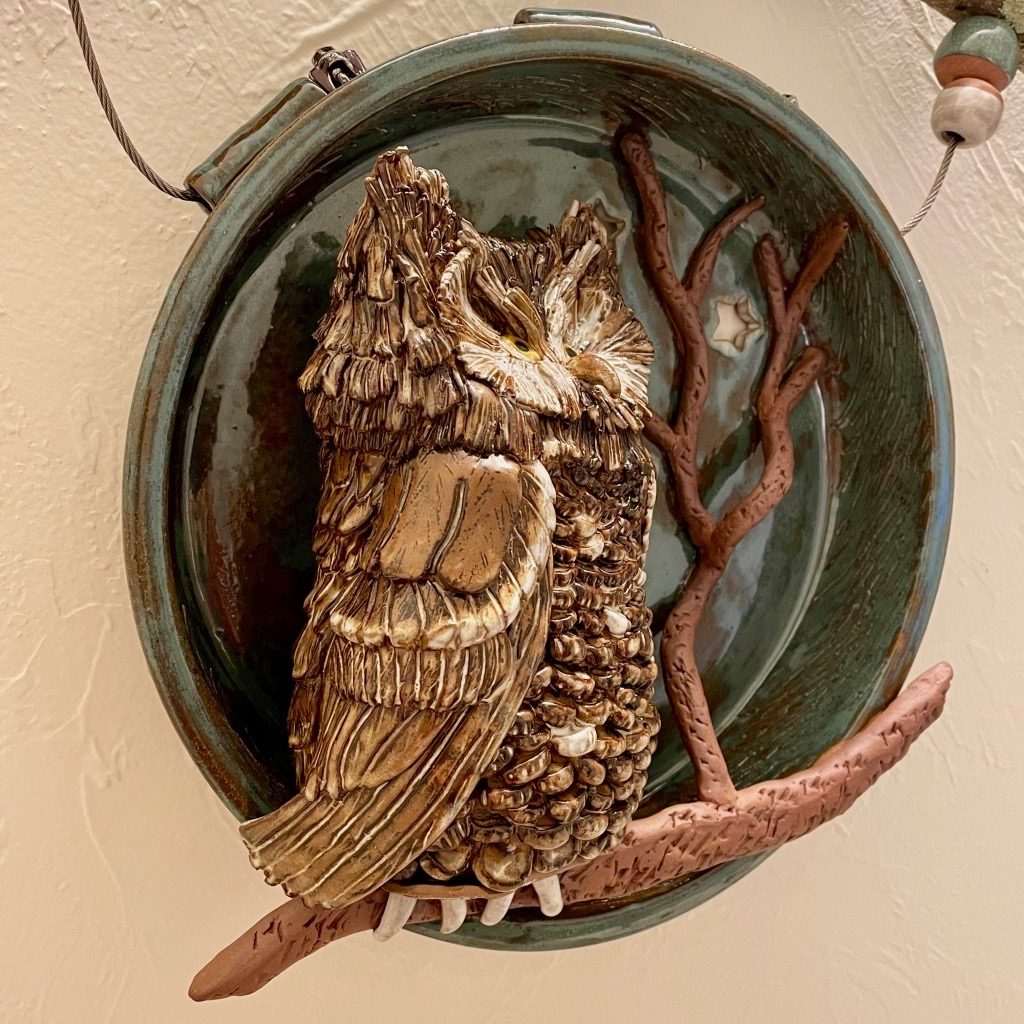
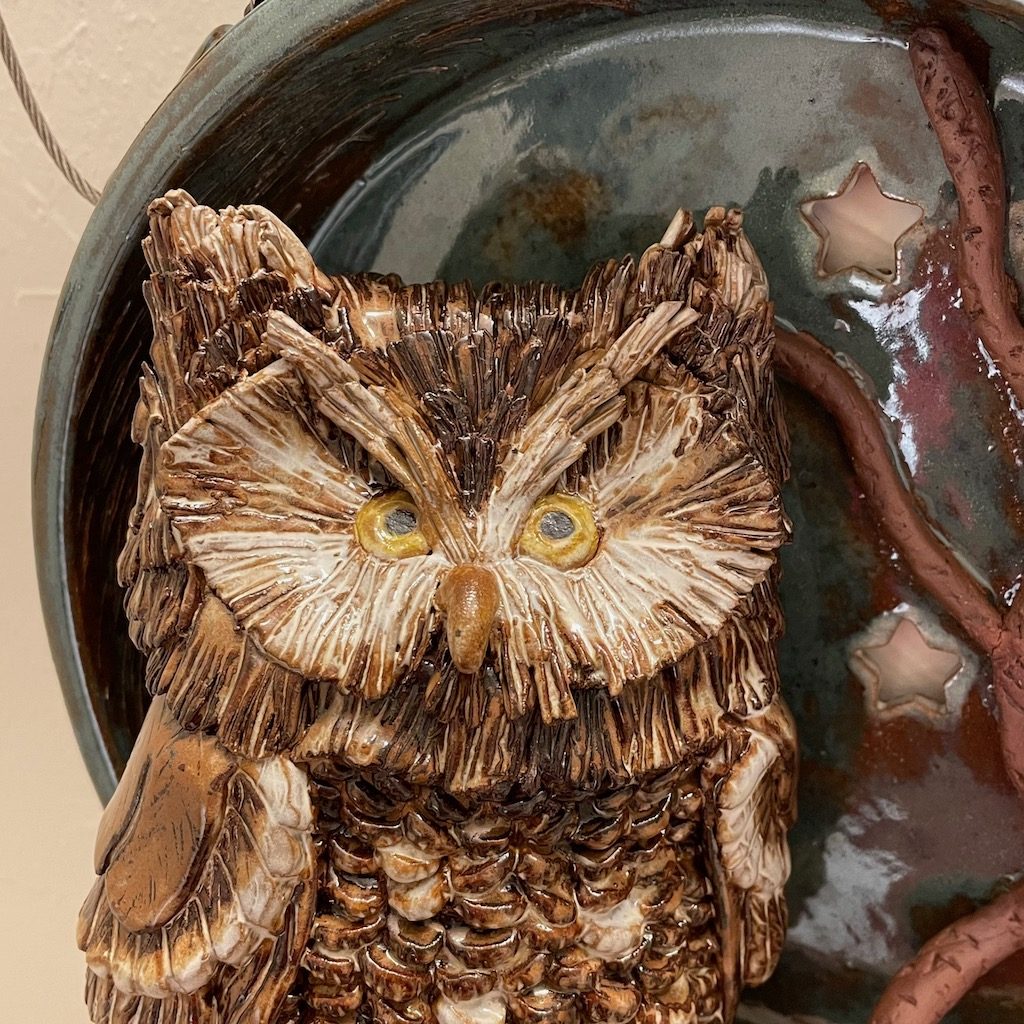
The owl’s roosting hollow was designed to make one feel it is a tree hidden in the night. To simulate twilight, I wanted the stars to shimmer, so I painted them with a white liner glaze inside the cut out and just barely outlined them on the surface in the same white liner glaze. When the piece was glaze fired, I placed small bisqued biscuits under the stars to avoid the glaze running and attaching the piece to the kiln shelf. As I mentioned in Part 1 of this Blog, the back of the roosting hollow might also be visible. To make it look more tree-like, I applied red iron oxide to the back of the roosting hollow. Depending on how red iron oxide is applied, it can give a mottled effect. To remove any remaining brush strokes and smooth the color, I rubbed a water soaked sponge over the areas where red iron oxide was applied.
My goal for glazing the owl was for the resulting glaze colors to blend just as the owl blends into her background in real life. Glazes when applied can appear very different from how they look after firing. This is because the chemical state of the glaze material changes in the oxidation environment in the kiln.
It is also interesting to see that the glazes look different depending on how the glazes are layered. I used this knowledge to create natural colors including dark brown, red, amber, ivory and white from just two glazes. I hand painted all of the glazes onto the bisque ware to achieve the desired effect. This allowed me to make the varied colors on the different feathers.
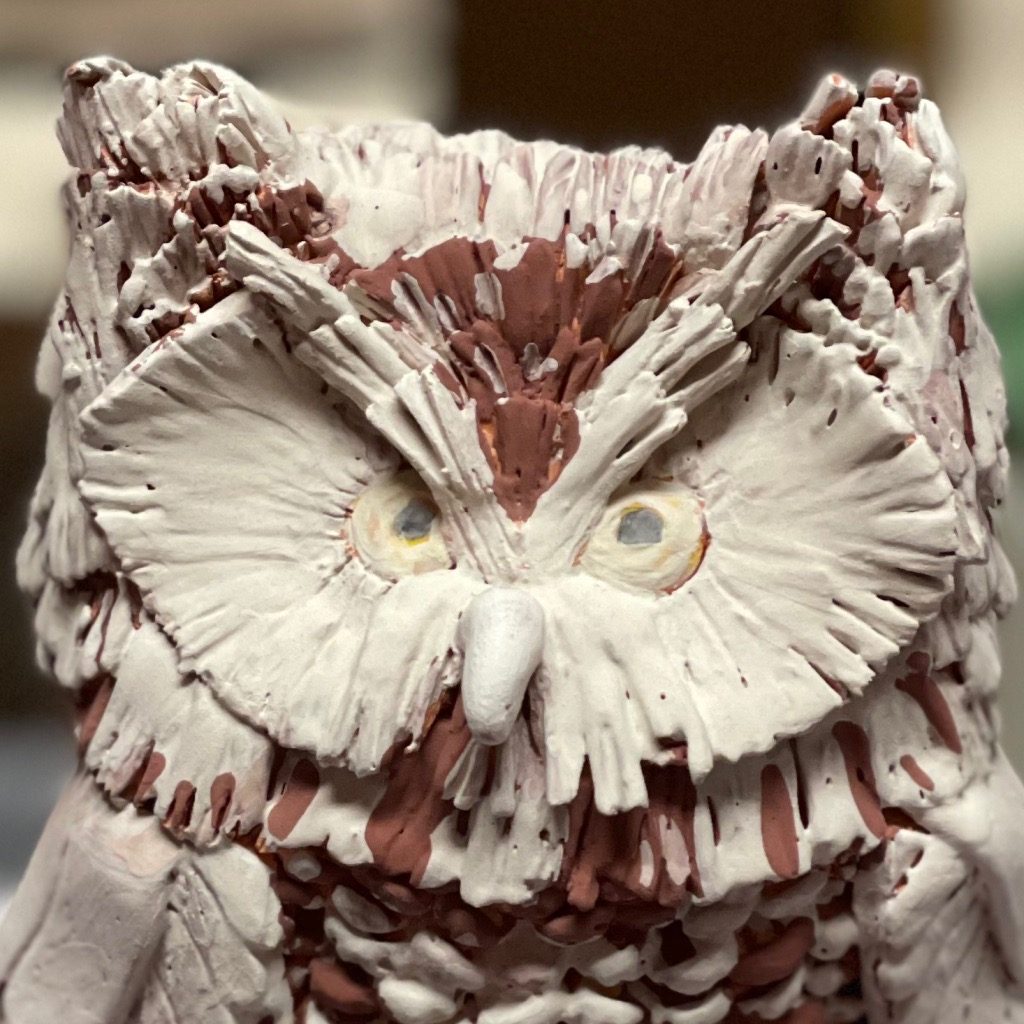
I mentioned before that I did use an underglaze for one part of the owl. I applied a yellow underglaze to the iris of her eyes, then painted over it with the white liner glaze. Usually, applying glaze over an underglaze will cover the color of the underglaze, but by using a thin layer of the white liner glaze, I achieved a soft yellow color for her eyes.
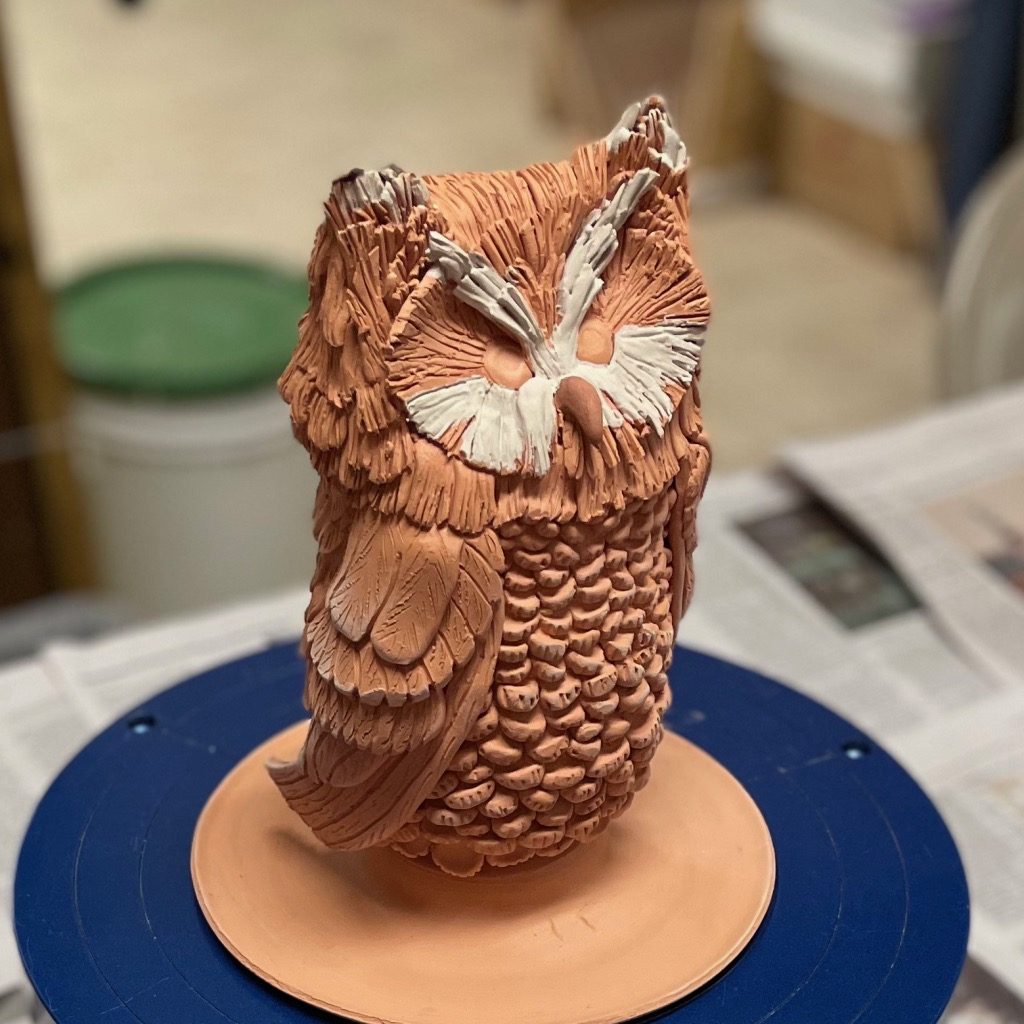
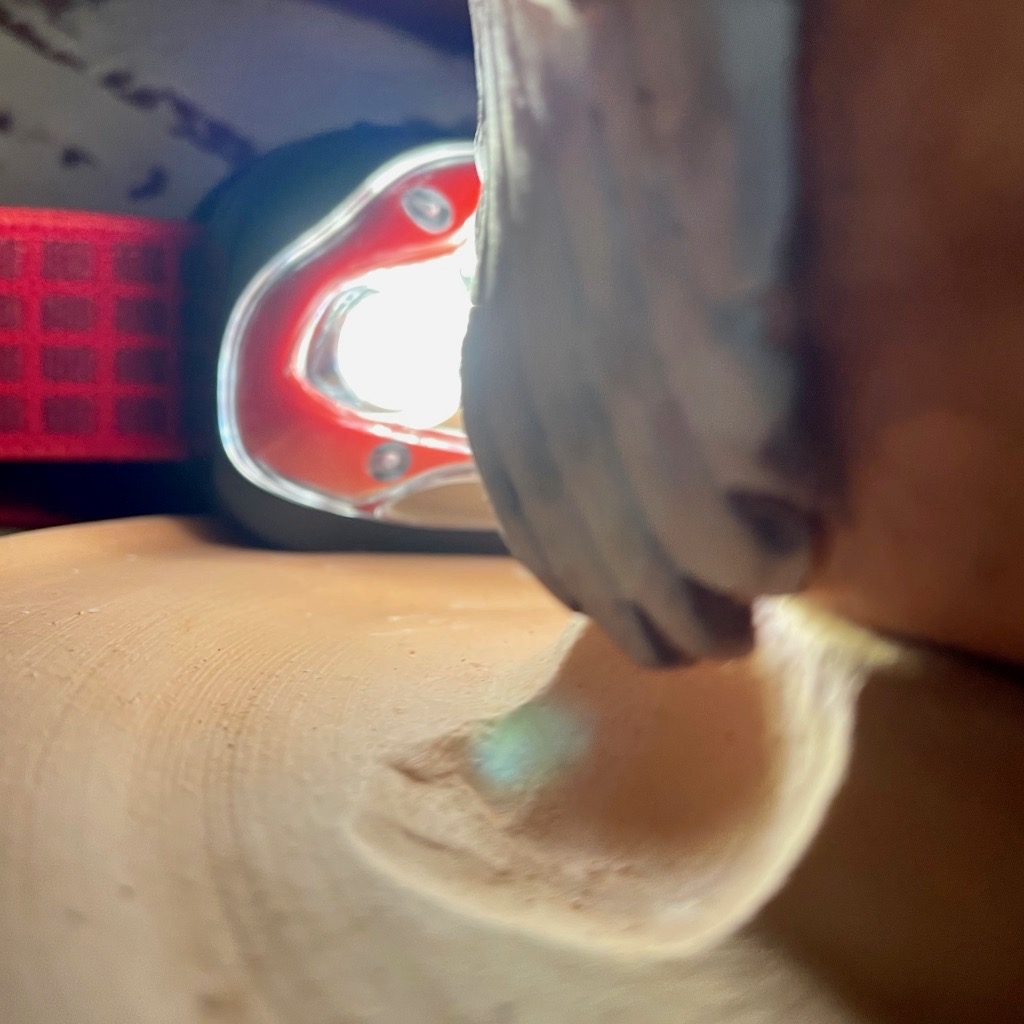
Since the back of the owl was partially visible and therefore glazed, I made a special firing chuck for her to prohibit the glazed piece from attaching to the kiln. The chuck holds her in a vertical position. This served two purposes. By firing the owl in a vertical position, it prevented the piece from becoming attached to the kiln shelf. An added benefit of loading the owl in a vertical position in the kiln helped make the feathers look more natural with the melting and flux of glazes at high temperatures.
You can see that I had to make a special indentation in the chuck to accommodate the tips of the wing feather. When loading the kiln, I used my camera to check the placement to ensure the pieces had not shifted as I placed them in the kiln. It was close, but the wing did not fuse to the chuck. The owl and chuck were stuck together after the glaze firing, but a soft tap on the chuck with a wooden dowel easily separated them.
Thankfully, the kiln started well and fired as expected. None of the pieces stuck to the shelves. And here she is peeking out from the kiln.
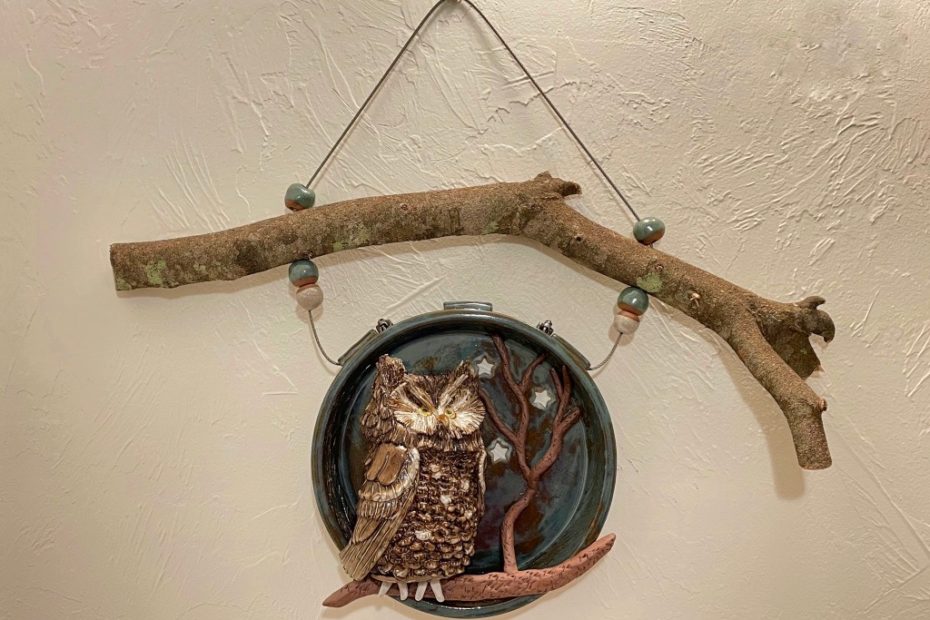
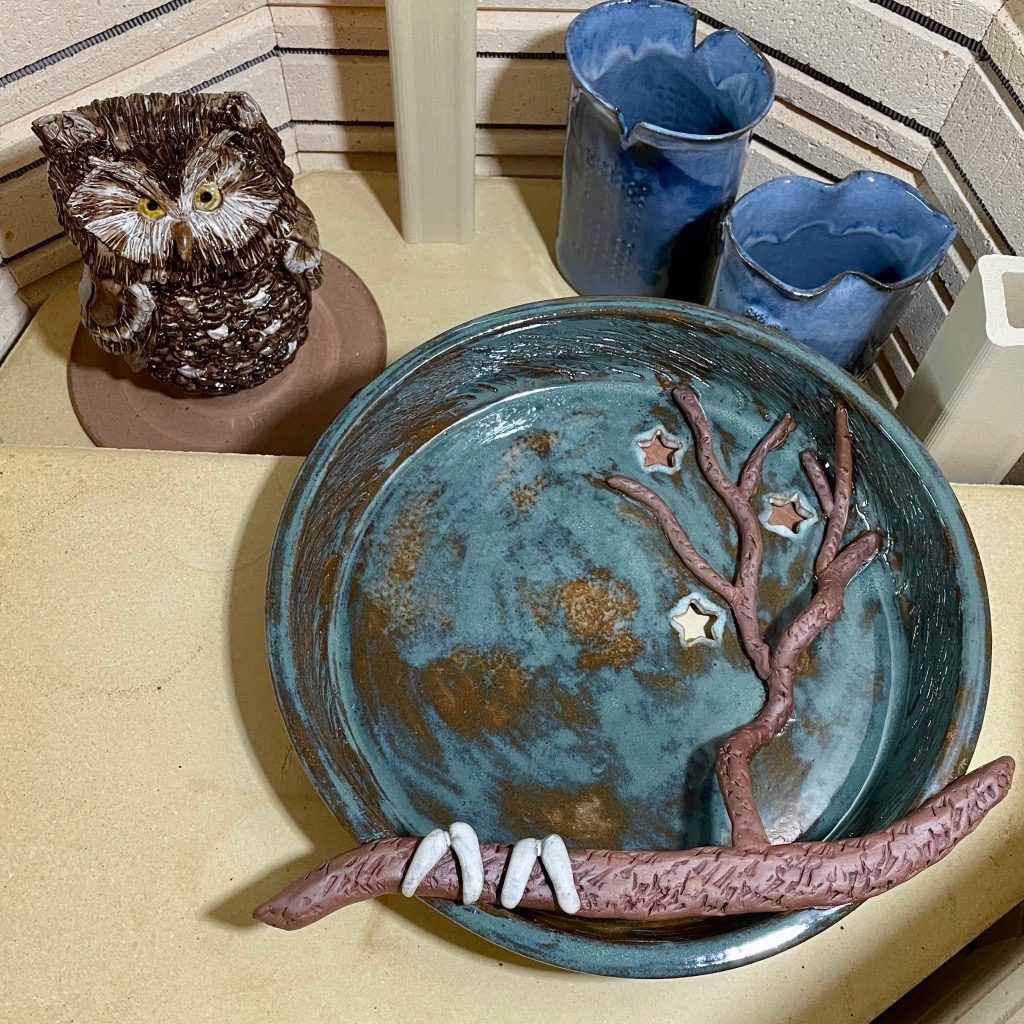
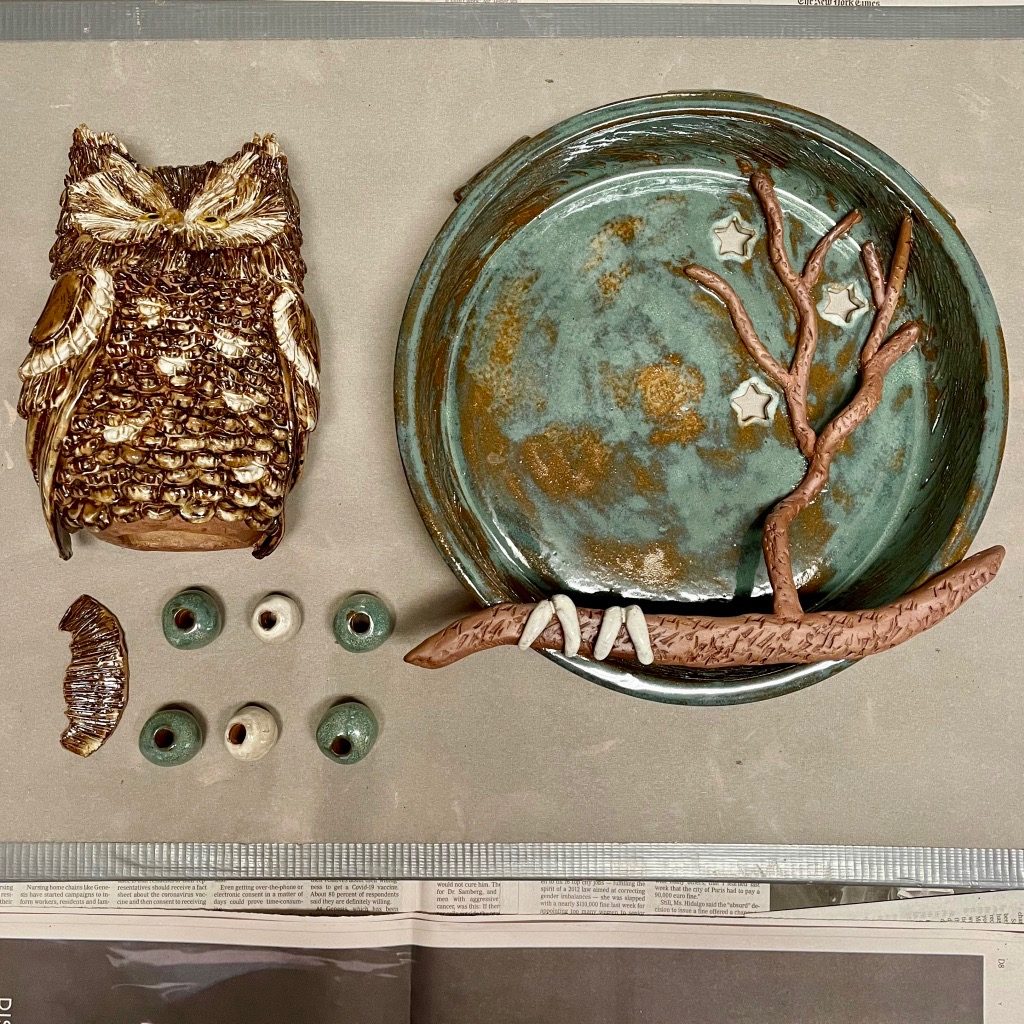
After I unloaded the pieces from the glaze firing, I began the assembly. These pieces could not easily be fired together since they needed glaze on the back as well as the front of the pieces, hence the need to assemble the pieces after the glaze firing. You can see from the photos that the owl’s feet were already attached to the branch on the roosting hollow. I made a specially fitted piece to cover the hole left from firing the owl vertically. It fit perfectly around the feet.
The hanging of the artwork was also a challenge. Because the owl was placed on one side of the roosting hollow, that side was heavier. I mentioned in Part 1 of this Blog that I had to account for being able to hang the completed piece straight. I wanted to avoid it looking like one of those paintings that always hang crooked on my wall. It must be genetic. Even my daughters notice crooked paintings on the wall. I had purposely added three coils for places to attach wire or cord for hanging the combined piece. I used stainless steel cable to withstand the environment. I adapted special screw clips to hold the cable taught and in place. And I added some ceramic beads to draw your eyes away from the cable and accentuate the natural element of the piece.
This was a fun and challenging project for me. I was so inspired by creating the piece that I wrote a poem dedicated to the Eastern Screech Owl. When the owl was finished and roosting in her tree hollow, I could almost hear her call of the tremolo. The poem expresses some of my feelings as I see the finished work, now having become Art at Home.
Twilight Tremolo by Sara Evans
Dedicated to the Eastern Screech Owl
I hear him swooping over marshes’ edge
As twilight falls into dark
And stars shimmer from afar
Above his unaware mark.
A whispering trill
Descends into the night.
I recognize her familiar tremolo,
Clothed in rusty red and downy white.
Of supernal love and sincerity,
Wistful is her family call
Echoing through the thick morass
From the tree’s dark hollow.
If you would like to see the Juried Art Exhibit in person, the pieces will be on display for sale through March 12 at the Sanibel-Captiva Conservation Foundation (SCCF) in their lovely outdoor garden showing examples of native vegetation. Be sure to follow me on Instagram and Facebook.
Update: “Twilight Tremolo”, one work in a series of Native Wildlife Sculptures, sold shortly after it was put on display and I am currently planning the next work in the series.
I thoroughly enjoyed reading the process creating this piece. It’s amazing to hear someone articulate the thought behind the design, even down to why you chose the beads! Twilight Tremolo , the poem is a beautiful tribute to the Eastern Screech Owl.
Thank you for your nice comments. This was a detailed process and I thought that writing about it might help others find their unique creative spark. This was the first owl that I’ve created…now to design another sculpture in the Native Wildlife Series.
Loved your story of creation and all the work behind the scenes in your 2 blogs ! The finished owl and its setting is really incredible ! I appreciate it even more knowing your process.
Looking forward to your next one.
I really enjoyed reading about your process for creating this art! Your finished piece is beautiful. I look forward to seeing and hearing about your next creation!
Thank you for your kind words, Sheila. This Native Wildlife Sulpture project has been quite interesting. I am enjoying creating new sculpture as well as learning more about the animals as I create them. I’ll keep you posted on the next creation.


I thoroughly enjoyed reading the process creating this piece. It’s amazing to hear someone articulate the thought behind the design, even down to why you chose the beads! Twilight Tremolo , the poem is a beautiful tribute to the Eastern Screech Owl.
Thank you for your nice comments. This was a detailed process and I thought that writing about it might help others find their unique creative spark. This was the first owl that I’ve created…now to design another sculpture in the Native Wildlife Series.
Loved your story of creation and all the work behind the scenes in your 2 blogs ! The finished owl and its setting is really incredible ! I appreciate it even more knowing your process.
Looking forward to your next one.
Thank you, Barb. I am glad that you enjoy reading about how I created the owl. I will be sure to let you know when I have finished the next sculpture.
Hi Sara,
I really enjoyed reading about your process for creating this art! Your finished piece is beautiful. I look forward to seeing and hearing about your next creation!
Thank you for your kind words, Sheila. This Native Wildlife Sulpture project has been quite interesting. I am enjoying creating new sculpture as well as learning more about the animals as I create them. I’ll keep you posted on the next creation.