Have you ever tried doing something totally different? To begin this new year, I stepped out of my typical functional art and began creating art for expression, for feeling, for just pure enjoyment. It has no more function than to elicit feelings and emotion. And I’ll be honest, I had so much feeling that I was inspired to write a poem about the subject of this work in addition to creating it. Yep, a poem. And that is something different for me, too. I will share the poem with you in Part 2 of this Blog.
But first things first: what is a tremolo? In music, a tremolo is the rapid repetition of a single note. When I play a tremolo on my violin I draw the bow back and forth across the string quickly. But in this case, I am talking about an Eastern Screech Owl. One of the calls of this owl is the tremolo that can be a mournful sound. It is a repeated sound that then trails off to softness. The owls’ calls normally begin at dusk in the twilight. I do not find this sound so mournful. To me, it is a peaceful call from one of their family to the other. (You can hear the Screech Owl’s call in the Macaulay Library of The Cornell Lab of Ornithology. The sound is not a screech at all).
The Sanibel Captiva Art League and the local Sanibel-Captiva Conservation Foundation (SCCF) held a juried Joint Art Exhibit with the theme Natives in the Garden. You may know that Sanibel is focused on conservation and preservation of land, wildlife and native vegetation. A friend and I decided to enter our ceramic art into the show. We had to choose a subject that is considered native to Sanibel and something that is in nature. My friend immediately chose a turtle not only because turtles are important to Sanibel, but because she was thrilled to see turtle tracks and turtle nests in the sand on the beach. The SCCF Sea Turtle Program monitors sea turtle nesting on Sanibel and Captiva, so creating a turtle was a great choice. I chose the adorable little Eastern Screech Owl because I like hearing the owls right outside my bedroom window at night. I thought I could do something special in creating that. It was both an artistic and engineering effort to create and construct the owl. Of course, everyone knows that I love an engineering challenge.
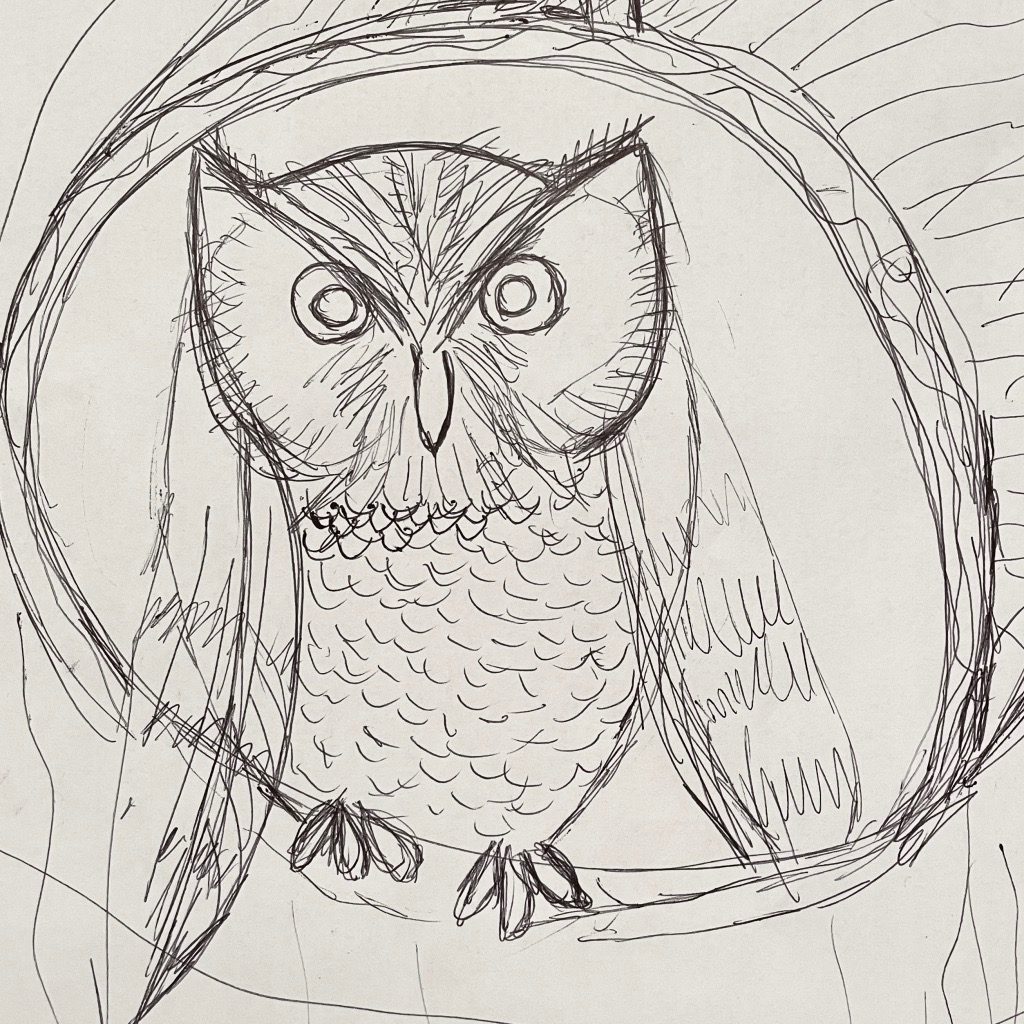
Just as I do with a new pot design, I first made a sketch to plan the work for the owl. I am not that good at drawing, but I was actually pleased with this sketch. I think it looks cute. I love throwing pottery on the wheel, so I wanted to somehow use pieces that were made on the wheel in the sculpture of the owl.
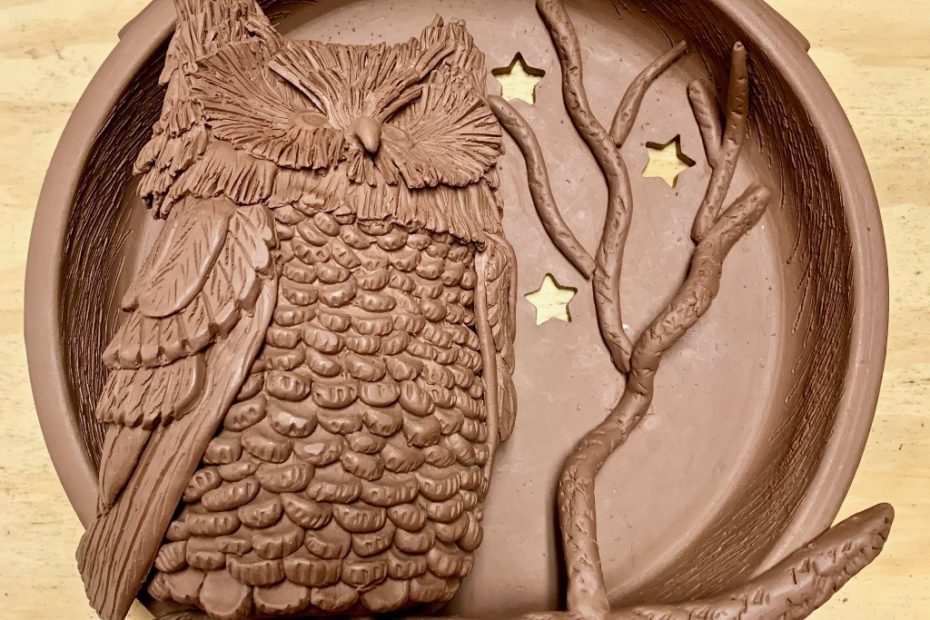
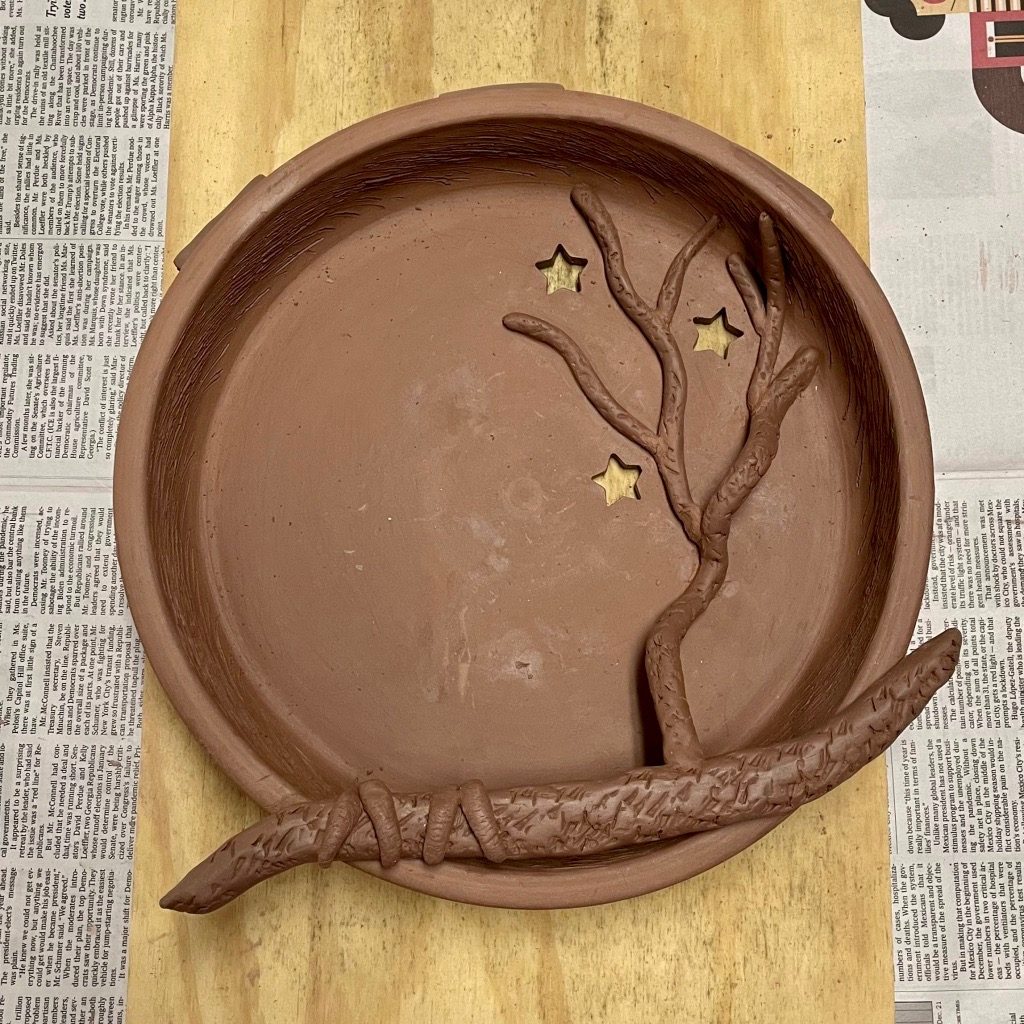
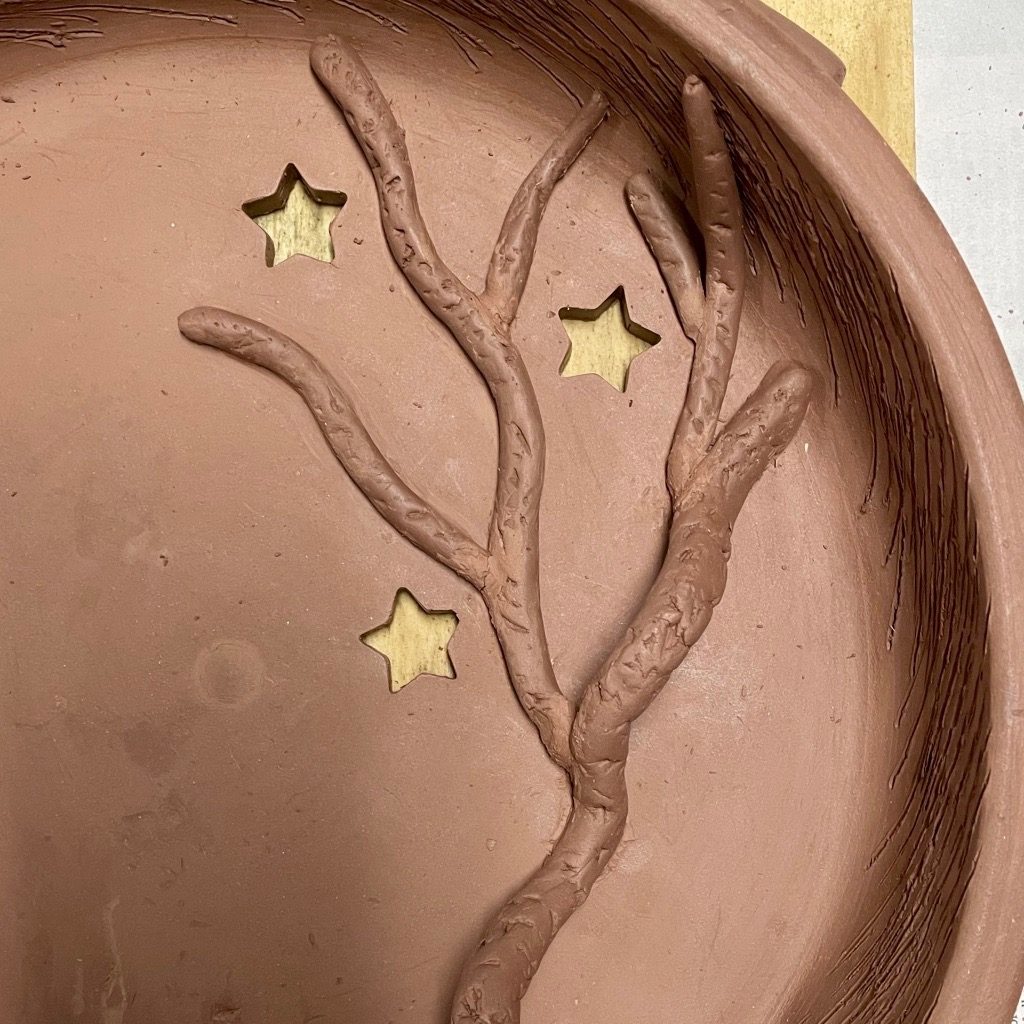
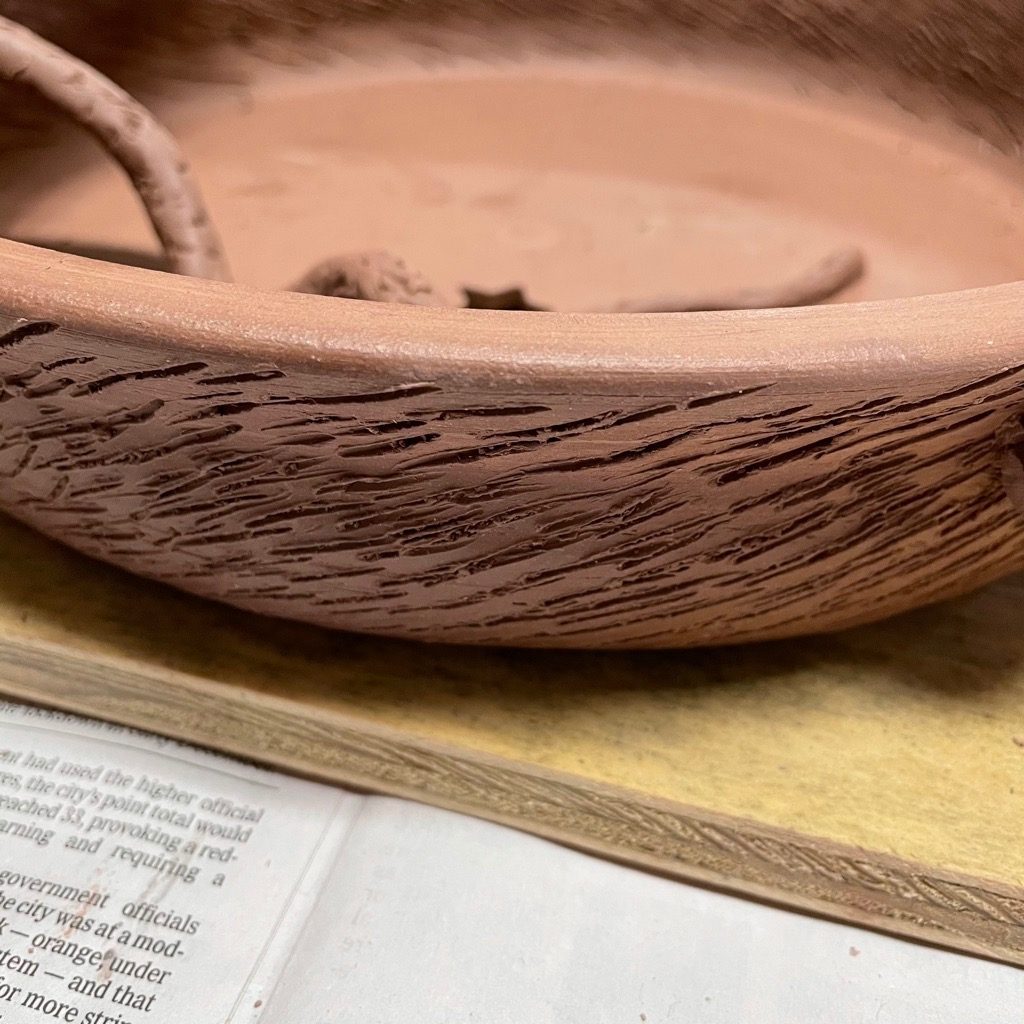
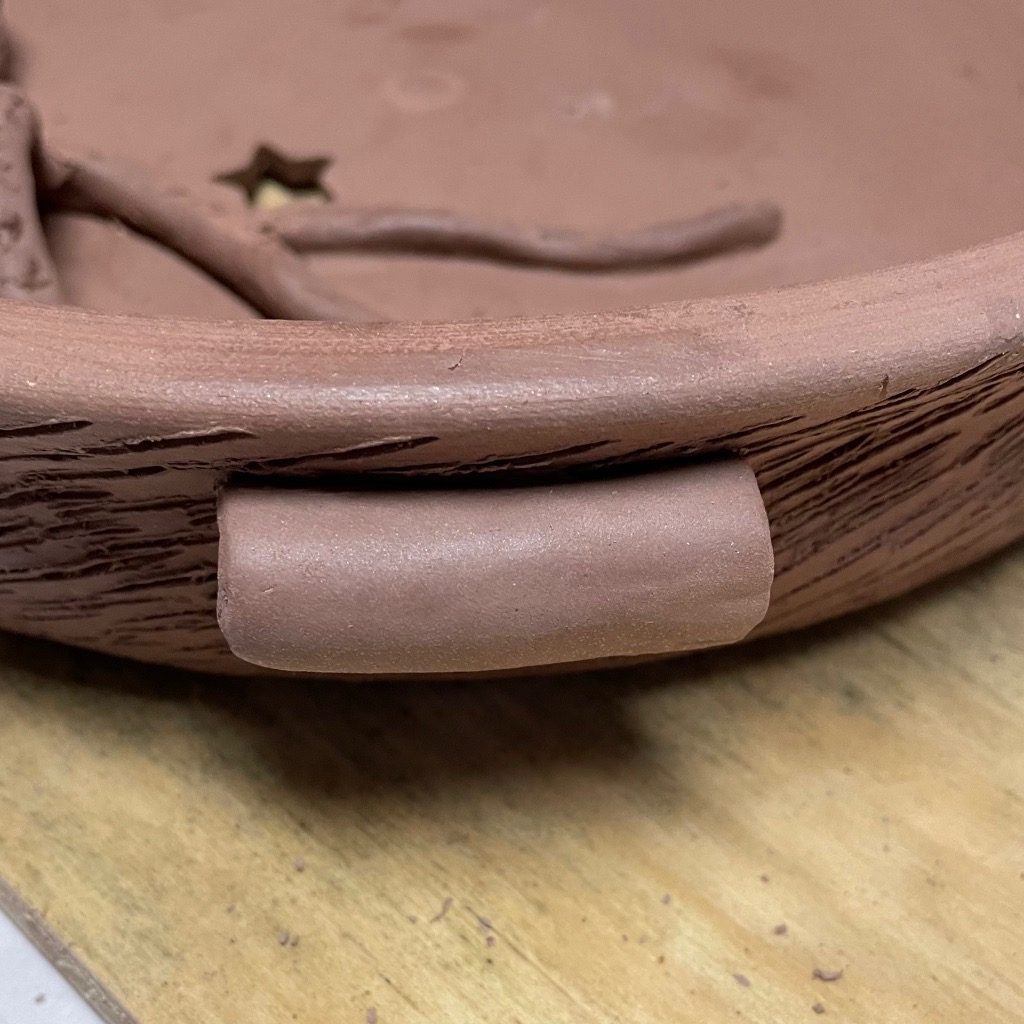
I have been making some closed forms and I realized that if I increased the size of the closed form, it would be the perfect under-frame for the owl. These owls like to sit in small places such as a hole or cavity in a tree or a small box. For their nesting place, I threw on the wheel a dish that when turned on its side emulated a roosting place in the hollow of a tree.
At this point, I was enjoying making this owl and roosting hollow so much that I completely forgot to take any photos to document the wheel throwing part of the creative process. But once I began hand-built alterations, I took photos of steps along the way. I added tree limbs and small cutout stars to the dish to suggest the effect of twilight.
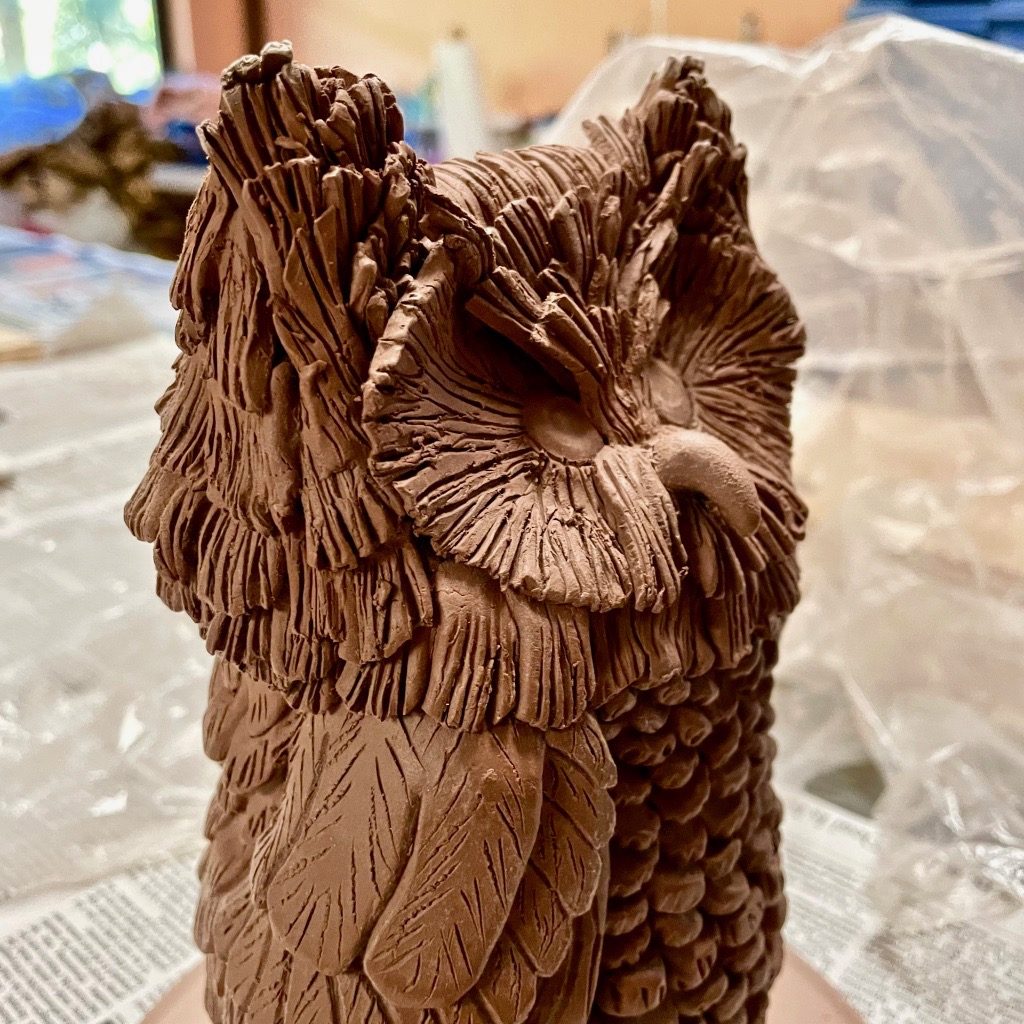
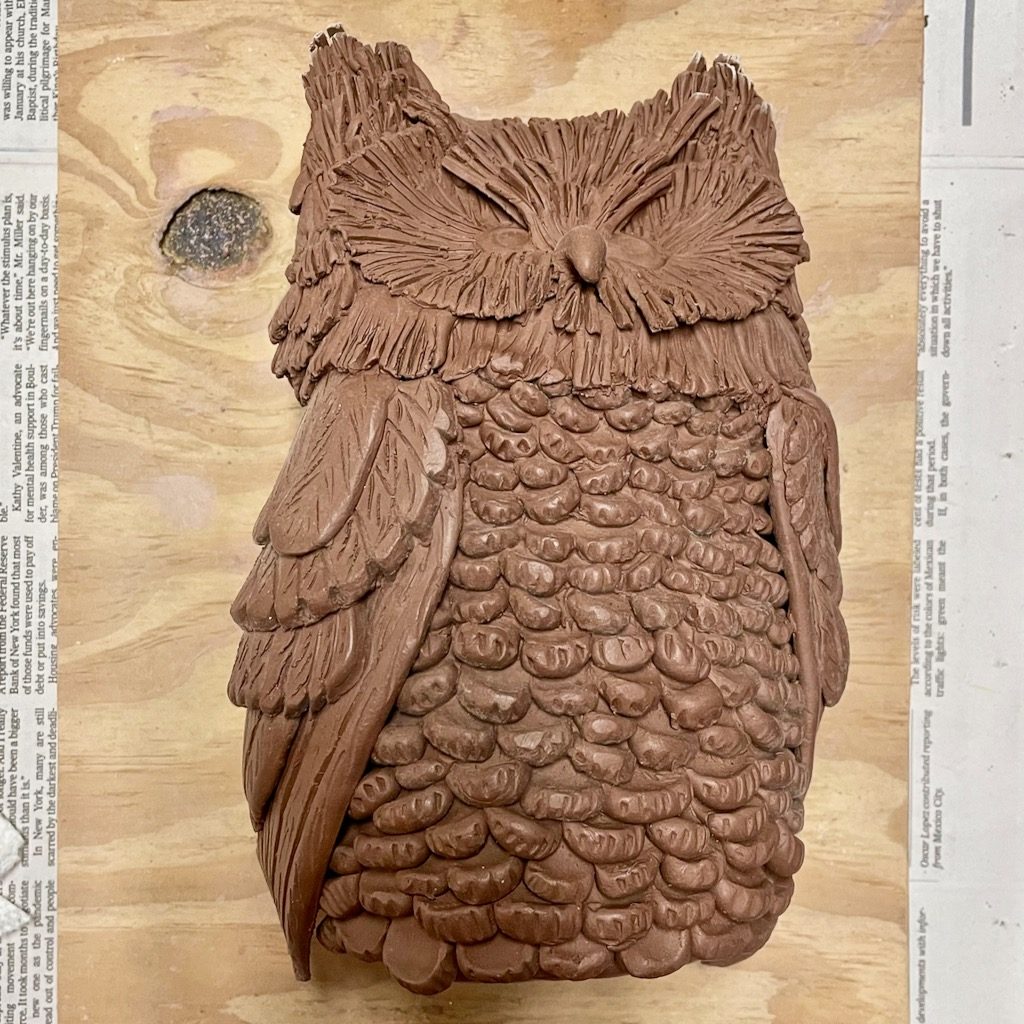
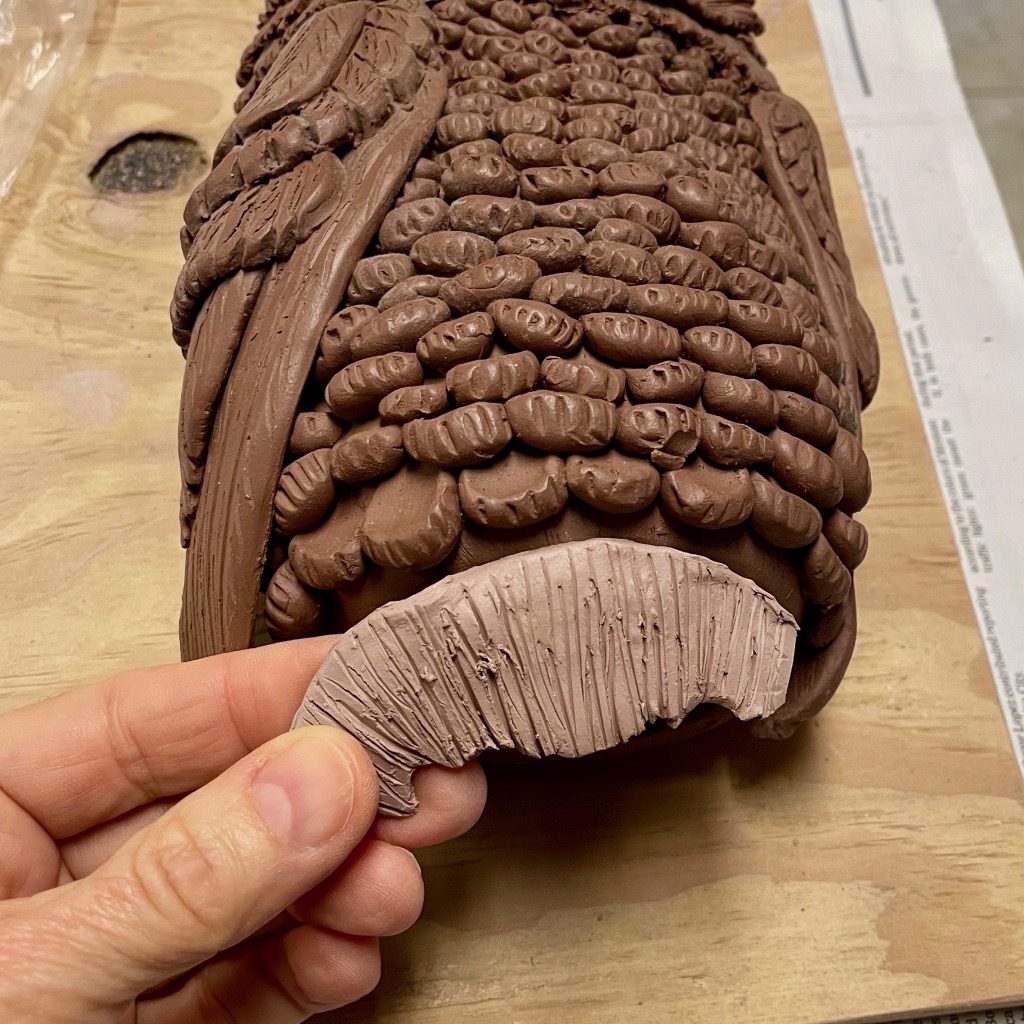
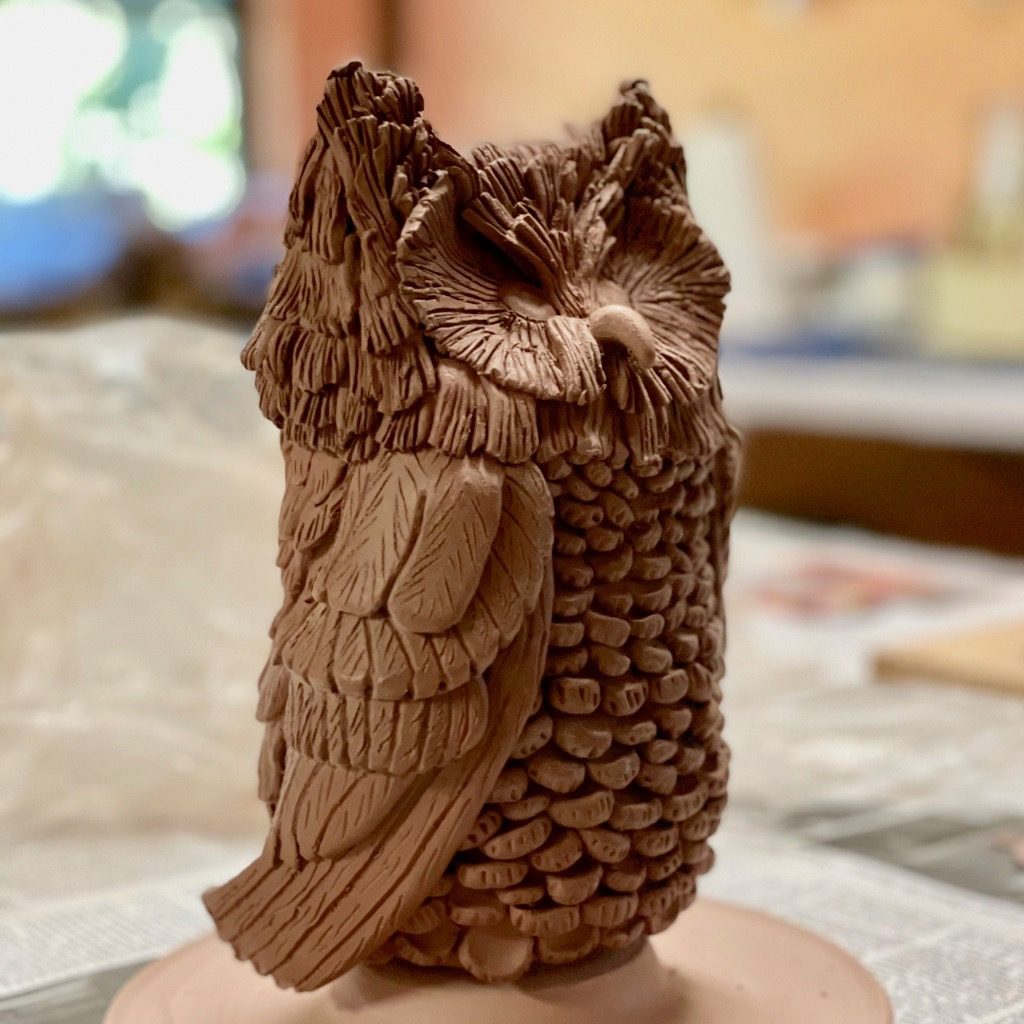
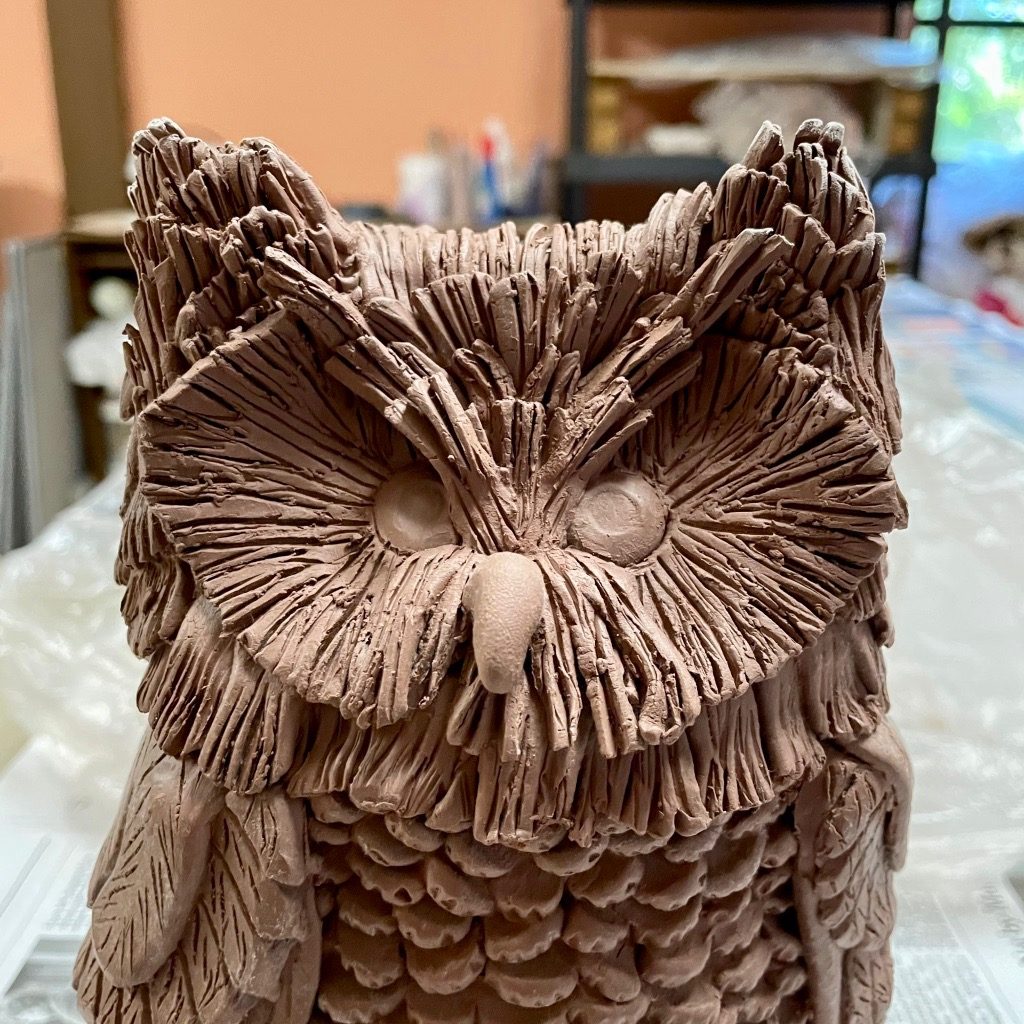
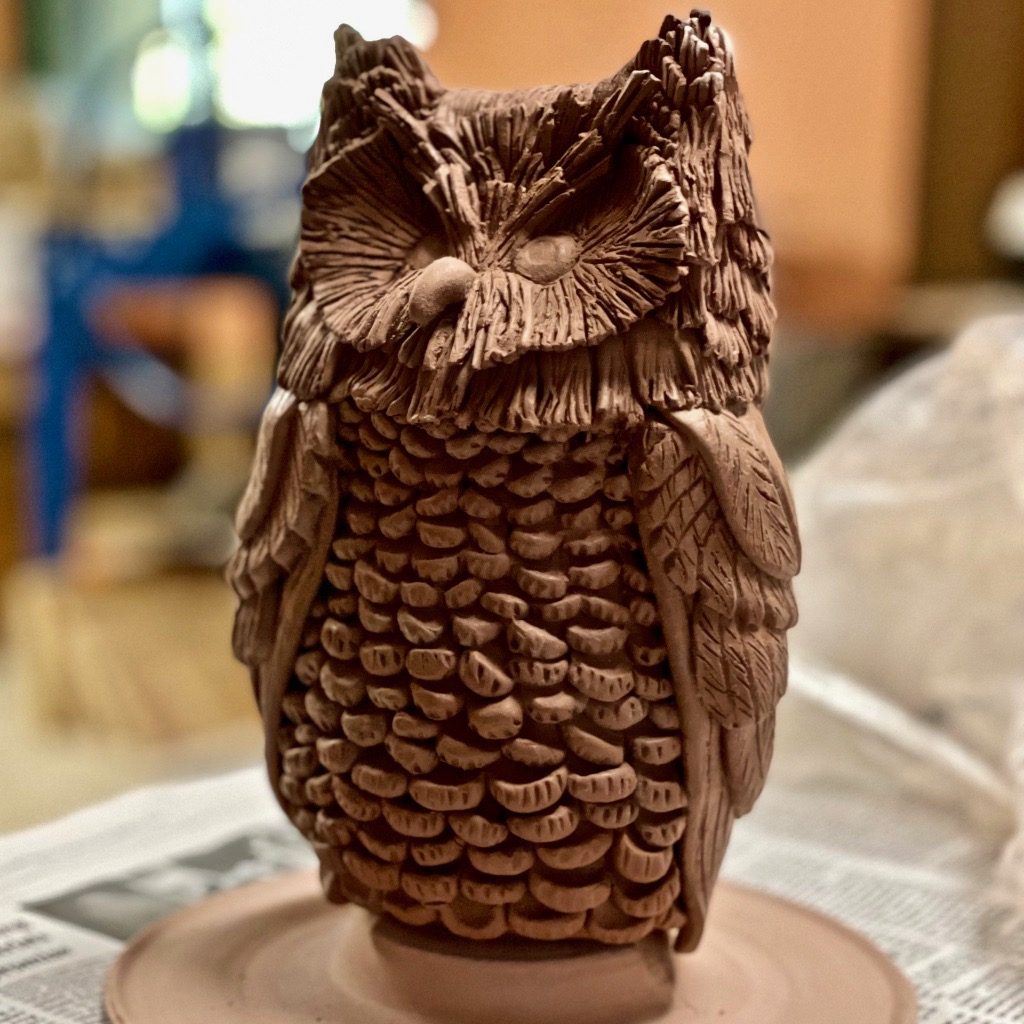
I said that I liked engineering challenges, right? Well, what about challenges that are artistic? Artistic challenges that I encountered included how to make the feathers appear stylistically realistic. It took some trials of playing with the clay to devise various methods to create all of the different types of feathers – wing feathers for flight, tail feathers for stability, fluffy feathers on the owl’s breast and wispy feathers on her head. To make the fluffy feathers on her breast, I rolled small balls of clay and then smushed them with my finger on one side. This is the same technique that I use when I put a thumb rest on a mug handle. To make the really wispy feathers, I rolled the clay very thin and cut small slices in it with a fettling knife. (A fettling knife is a long, flexible knife used to cut clay. Unlike a chef’s knife it is not very sharp.) When I attached these feathers, I only attached them at one end so that the “feathers” would stick up. There are so many details that one must consider in advance, including the order of attachment.
One of the engineering challenges was to determine how to apply all of the feathers to make them appear stylistically natural. I developed the order of the feather application for the design to ensure that they would lay naturally over one another. You can see how the feathers lay in the leather hard stage. I was pleased that she (the owl) was really starting to take on some character.
I also considered how to alter the surface of the tree hollow to simulate bark and how to make the tree seem three-dimensional.
I designed special hangers to hold the weight of the piece evenly since the owl placement was on one side of the piece. I needed to ensure that the piece would hang straight once it was put together. I wanted to avoid it looking like one of those paintings that always hang crooked on my wall, just begging me to straighten it every time I walk past.
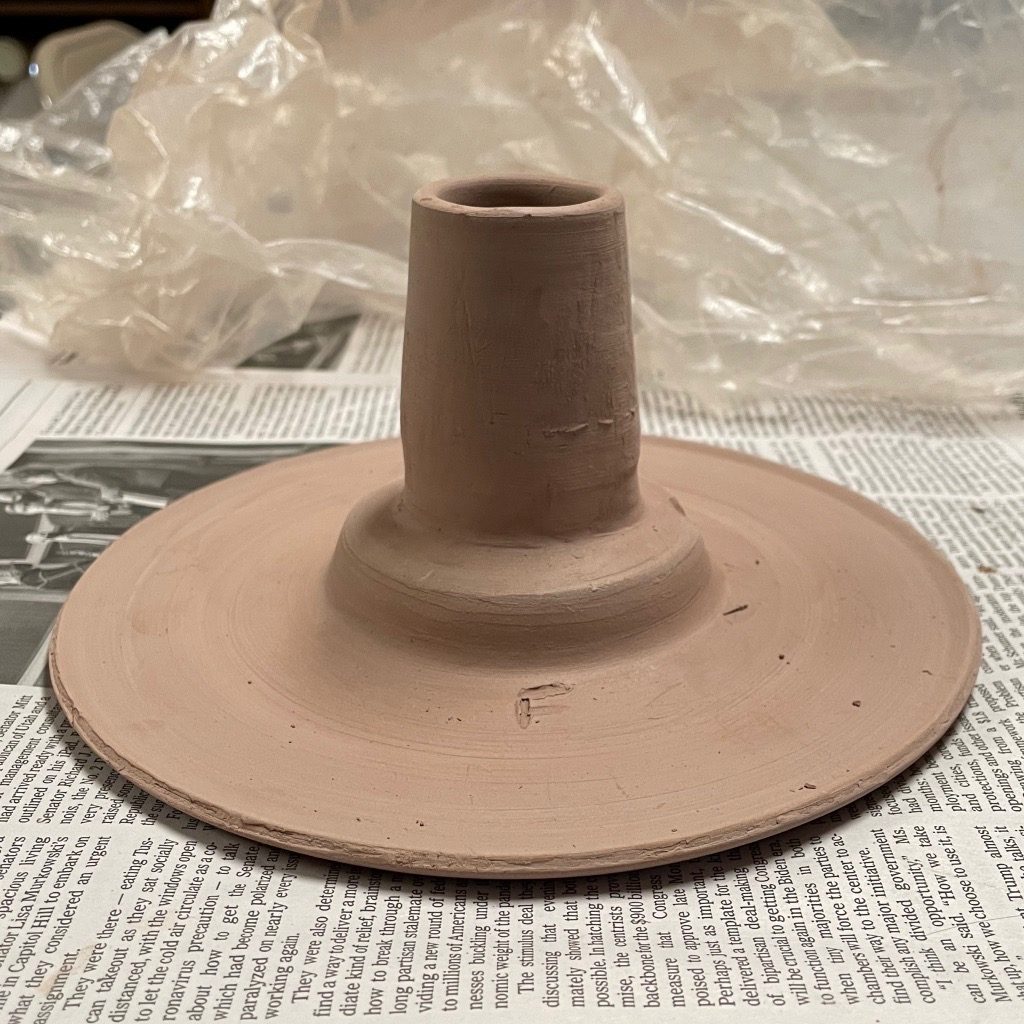
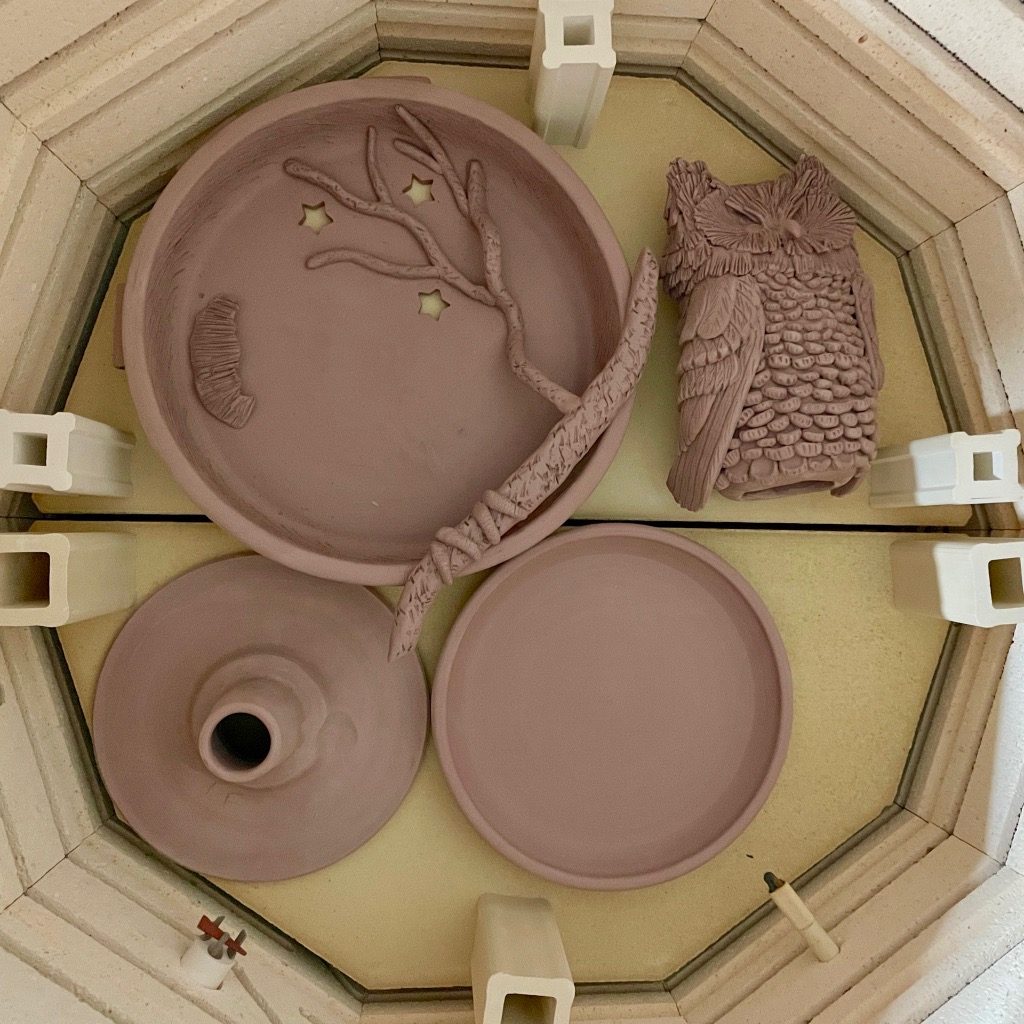
Finally, before proceeding, I had to consider how the components of the sculpture would be combined into one work for a pleasing visual effect. Since the back of the owl and the roosting hollow were partially visible, they needed to be glazed in some way. I could not reach the back of the owl to glaze it if it was already attached to the tree hollow. I made a special firing chuck so that the owl could be fired standing vertically in the kiln when it is fired. (Yay!! I got to throw on the wheel again.)
In ceramics, a chuck is normally made on the wheel out of raw clay to provide a stand to hold the leather-hard pot for trimming. In this case, I am using the chuck in the kiln to hold the owl in a vertical position in the glaze firing. Firing the owl in a vertical position on the chuck prevents the piece from becoming attached to the kiln shelf.
With the design details completed, all of the pieces, including the special chuck, were loaded in the kiln for a good rest and bisque firing. In this firing, I laid the owl on her back rather than standing on the chuck so that the inside was more open to the kiln heat. The bisque firing removes all water, including chemical bound water, from the clay by heating the wares to around 1940 F (1060 C). It makes the clay semi-vitrified and therefore bonded into a solid that is stable for handling and glazing. The bisque ware is still fragile but much more durable than greenware (unfired clay that is dry).
The owl is well on her way to becoming “Art at Home”.
Coming soon, see my next Blog post, Twilight Tremolo – Part 2, for how I glazed and finished the work and, of course, the FINAL REVEAL. You can also follow me on Instagram and Facebook.
Thank you. I am glad that you liked it. I enjoyed making the owl.
Sheila Hanford
This is fascinating! The owl is so cute. I can only imagine how much work it was to make. I’m looking forward to more pictures and the next blog post Sara!
Thank you. I enjoyed the process of creating the owl.
Mary Calabro
Sara, read the entire Blog entry. It was really interesting. I wonder when you do the next owl if you would add some shading or color. I looked at pictures on the web and the owls seems to have shading. Just in case you need another challenge.
Thanks for reading my blog about the process of making the Screech Owl. This blog posting is Part 1 of the overall posting on the making of the Screech Owl. I will post Part 2 in a few days. Part 2 will explain the glazing process and how color is added to the bisque fired piece. Stay tuned!
Merry
Sara, you are a creative genius! Love for our friends at CROW to see your creation.
Amazing work, Sara!
Thank you. I am glad that you liked it. I enjoyed making the owl.
This is fascinating! The owl is so cute. I can only imagine how much work it was to make. I’m looking forward to more pictures and the next blog post Sara!
Thank you. It was a fun and interesting piece.
Love your owl! It is amazing to follow the process of creating it step by step.
Thank you. I enjoyed the process of creating the owl.
Sara, read the entire Blog entry. It was really interesting. I wonder when you do the next owl if you would add some shading or color. I looked at pictures on the web and the owls seems to have shading. Just in case you need another challenge.
Thanks for reading my blog about the process of making the Screech Owl. This blog posting is Part 1 of the overall posting on the making of the Screech Owl. I will post Part 2 in a few days. Part 2 will explain the glazing process and how color is added to the bisque fired piece. Stay tuned!
Sara, you are a creative genius! Love for our friends at CROW to see your creation.
Thank you, Merry. I don’t know about genius, but I am having fun and I hope that people enjoy the creations.
Great piece Sara. Loved reading about the process. Thanks for sharing. Looking forward to more.
Thank you. I am glad you enjoyed it.
Comments are closed.